Getting Started
Visionary Render provides out of the box, configuration-free integration with consumer VR systems including:
- Meta Quest 2
- Oculus Rift, Rift S, tracking (software version 1.3 or above)
- HTC Vive, HMD Vive Pro or Valve Index HMD, Lighthouse tracking, pointers (SteamVR version 1.0 or above)
- zSpace (software version 3.1 or above)
- Windows Mixed Reality HMD, Windows MR Portal (SteamVR version 1.0 or above)
- Microsoft HoloLens 2
HoloLens 2 support was added in the 2021.3 release and the original HoloLens is no longer supported as of this release.
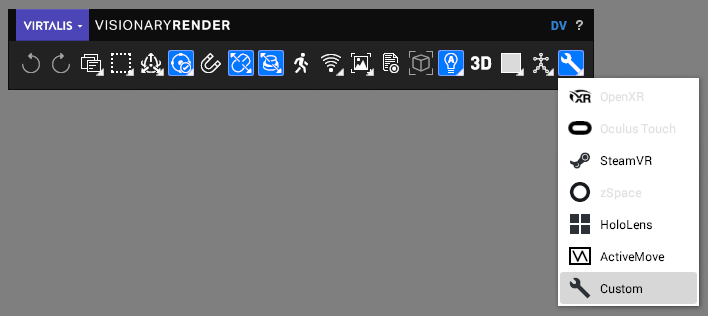
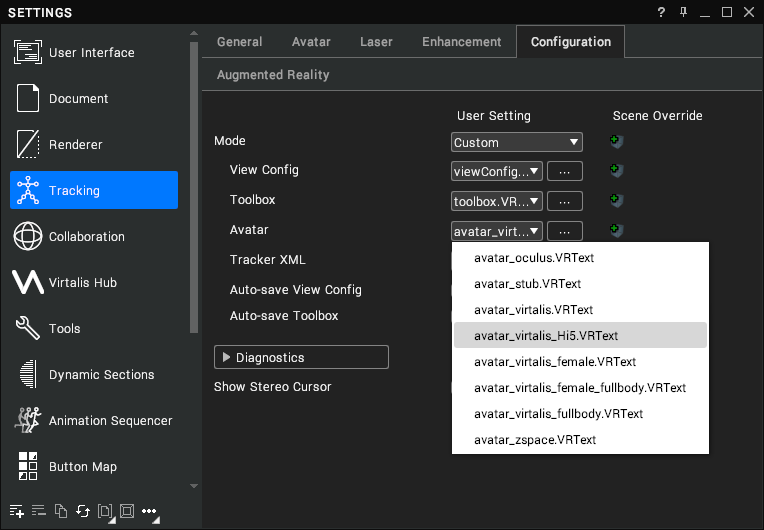
The current tracking mode can be set from the Toolbar, Settings window or via the -tracking-mode option on the command-line (see Command-line).

Enabling one of the tracking modes requires the device to be connected to your computer and configured per the manufacturer's directions. Switching between modes will automatically connect to, and initialise, the requested device.
Switching between tracking modes automatically reconfigures the view configuration and avatar as required. Note that you can overwrite the default avatar used by each tracking mode via the Tracking > Configuration > Avatar setting.

When using Oculus or SteamVR modes, the Viewport button becomes available to toggle the mirroring of the HMD view on the main desktop display. Turning this off can improve performance in the headset.
OpenXR
OpenXR is a new immersive mode in 2023.1 that currently supports the following runtimes:
- Oculus
- Windows Mixed Reality
- HTC Vive
SteamVR is not currently supported. Other runtimes not listed may still work but we can't make any guarantees.
To use any OpenXR-compatible headset with Visionary Render, follow these steps:
- Ensure the headset is turned on and connected to the PC, and OpenXR mode is enabled.
- Launch Visionary Render in standard desktop mode (i.e. no -viewConfig or -tracker parameters).
- Open a scene and select the OpenXR option from the tracking menu in the Toolbar.
- The headset will now initialise.
- There are no other settings. The application will remember the display mode and above settings at exit and will start up with OpenXR mode enabled automatically from now on.
If input for your controller or device is awkward or not working, get in touch with us and we can fix it using the bindings in data/openxr/actionBindings.json. We have no way to know nor test the proper bindings for all devices in advance.
Oculus Touch
To use the Oculus Rift with Visionary Render, follow these steps:
- Ensure the Oculus Rift is connected to the PC and the latest Oculus Runtimes are installed.
- Launch Visionary Render in standard desktop mode (i.e. no -viewConfig or -tracker parameters).
- If in the Start Room, press the glowing VR on the main UI stand. Otherwise select the Oculus option from the tracking menu in the Toolbar.
- The Oculus Rift will now initialise.
- The Viewport button in the Options rollout will become available to toggle the main window viewport. Turning this off can improve performance in the headset.
- There are no further settings. The application will remember the display mode at exit and will start up with Oculus Rift mode enabled automatically from now on.
As of the 2023.1 release, the Oculus immersive mode has been renamed Oculus Legacy and can only be accessed from Settings/Tracking/Configuration/Mode. Scripts can still use vrEnableNodeWhenOculusAvailable(vrnode node).
SteamVR
To use any SteamVR-compatible headset with Visionary Render (such as HTC Vive, Valve Index or Windows Mixed Reality) follow these steps:
- Ensure the headset is connected to the PC, and SteamVR is installed and running.
- Launch Visionary Render in standard desktop mode (i.e. no -viewConfig or -tracker parameters).
- If in the Start Room, press the glowing VR on the main UI stand. Otherwise select the SteamVR option from the tracking menu in the Toolbar.
- The headset will now initialise.
- In the Settings window (F6), on the Tracking tab, some additional options are available below the tracking dropdown box:
- Tracking Universe - specify whether the HTC Vive is being used Seated or Standing.
- Enable Visuals - draws the virtual representations of the Wand controllers and Lighthouses in the scene.
- Reset Tracking Origin - press this when using the Seated Tracking Universe to centre yourself in your seated position.
- The Viewport button in the Options rollout will become available to toggle the main window viewport. Turning this off can improve performance in the headset.
- There are no other settings. The application will remember the display mode and above settings at exit and will start up with SteamVR mode enabled automatically from now on.
zSpace
To use the zSpace with Visionary Render, follow these steps:
- Ensure the zSpace is connected to the PC and calibrated with the zSpace application.
- Launch Visionary Render in standard desktop mode (i.e. no -viewConfig or -tracker parameters).
- If in the Start Room, press the glowing VR on the main UI stand. Otherwise select the zSpace option from the tracking menu in the Toolbar.
- The zSpace will now initialise.
- In the Settings window (F6), on the Tracking tab, an additional option is available below the tracking dropdown box:
- Eye IPD - manually adjust the stereo eye separation on the zSpace display.
- There are no other settings. The application will remember the display mode and above settings at exit and will start up with zSpace mode enabled automatically from now on.
HoloLens 2
As of the 2021.3 release, Visionary Render supports the HoloLens 2 and no longer supports the original HoloLens.
To use the HoloLens 2 with Visionary Render, follow these steps:
- Ensure the HoloLens is connected - by Wi-Fi - to the same network as the PC you are running Visionary Render on.
- Open the Microsoft Store on the HoloLens and install the Holographic Remoting Player app.
- Start the Holographic Remoting Player on the HoloLens - it will display the IP address of the HoloLens then wait for a connection to be established.
- In Visionary Render, enable the HoloLens desktop immersion mode via the Toolbar or Settings window. Once enabled, the connection status window below will be displayed.
- If this is your first time using HoloLens Remoting, click the Settings button on the connection status window and input your HoloLens IP as displayed by the HoloLens 2 Remoting Player.
- Visionary Render should now connect to the HoloLens and the HoloLens should switch to displaying your scene. The connection status window will tell you the current connection status.
- If you need to reconnect at any time you can do so by pressing the Reconnect button on the connection status window. If a loss of connection is detected then Visionary Render will automatically try to reconnect to the HoloLens.
See Augmented Reality for information on using the HoloLens 2.
Disabled
To disable tracking, click on the Toolbar button so that it isn't highlighted. When disabled, the following settings are available in Settings > Tracking:
- Eye IPD - manually adjust the stereo eye separation.
- Screen Width - the physical width of the desktop monitor.
- Field of View - the field of view of the main viewport.