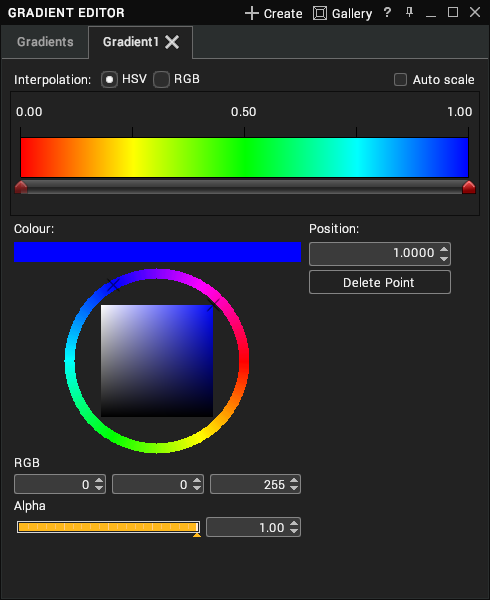
Gradient Editor
The Gradient Editor permits you to create colour gradients to apply to objects in your scene. A gradient is composed of two or more gradient points, each with a colour and position along a horizontal axis. The colours are interpolated between each pair of points to produce a final gradient.

To open the Gradient Editor, click on the Virtalis button at the top-left of the Toolbar and select Windows > Gradient Editor. Alternatively, click and hold left mouse button over the Windows menu of the Toolbar and select Gradient Editor. There are various actions that will cause the Gradient Editor to appear, like double-clicking on a Gradient node in the tree view or Browser. It can also be shown or hidden with Ctrl + K.
Create
There are various ways to add a gradient to your scene:
- Click on the Create button in the titlebar of the Gradient Editor.
- Select the Gradients filter in the Browser then right-click and select Create Gradient from the context menu.
- Right-click on the Libraries node in the Developer tree and select Create > Gradient from the context menu.
- Click on the Gallery button in the titlebar of the Gradient Editor to show the available gradients in the Gallery. Select a Gradient and click on the Add To Scene button.
Edit
Points
By default, gradients contain 2 points when created. New points can be added to a gradient by left-clicking somewhere on the grey bar beneath the horizontal gradient image. A new red marker should appear at the click location.
To move a gradient point (other than the minimum or maximum point), hold down left mouse button over it and drag the mouse left or right. Alternatively, you can assign an exact position to it by selecting the gradient point and changing the value in the Position number box (which works for the minimum and maximum points too).
To modify the colour at a point, simply select it and change its values in the colour picker. To remove a point, select it and press the Delete key or click on the Delete Point button.
Interpolation
The gradient editor supports two types of interpolation: HSV (Hue, Saturation, Value) and RGB. The images below show how they differ for a simple two-point gradient. HSV is the default interpolation mode.
Scale
A gradient can be scaled by changing the position of the minimum or maximum gradient point. This can be done with the Position number box.
Auto Scale
The auto scale checkbox can be enabled to preserve the relative positions of gradient points when scaling the gradient (so that the gradient remains unchanged, aside from representing a different range of values).
Usage
To apply a gradient to a node in the tree:
Select a Material in the Libraries tree that you wish to add a gradient to.
Drag the gradient node from the tree view or Browser onto the Colour Map property of the material. It will now be applied to any Visuals that make use of the material.
To apply a gradient to a node in the scene:
Navigate to the visual that you wish to add a gradient to.
Drag the gradient node from the tree view or Browser onto the visual.