Script Editor
The Script Editor is a simple text editor that permits you to write Lua scripts and GLSL code for View Shaders. This manual will cover the user interface – for information on writing scripts, see the Programming Guide.

To open the Script Editor, click on the Virtalis button at the top-left of the Toolbar and select Windows > Script Editor. Alternatively, click and hold left mouse button over the Windows menu of the Toolbar and select Script Editor. It can also be shown or hidden with Ctrl + L.
Tab Bar
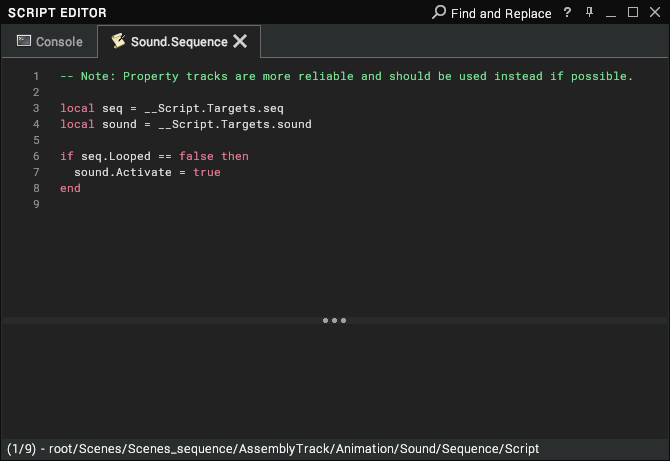
The tab bar permits multiple scripts to be opened at once (alongside the Console, which is always open). The title of a tab is the name of the parent node that the script is attached to followed by the type of script.
The icon may be one of the following:
| Icon | Description |
|---|---|
| A script with no unsaved changes or compile errors. | |
| A script with unsaved changes. | |
| A script with compile errors. |
Mouse over a tab to see a tooltip with the path to the script in the scene. Right-click on a tab to open the context menu.
| Option | Description |
|---|---|
| Close | Close the current tab. |
| Close All BUT This | Close all tabs apart from the current one. |
Text Editor
The text editor is the main panel of the window. It permits code to be created and edited and supports typical programming aids like syntax highlighting and autocomplete.
Syntax Highlighting

The Script Editor supports basic syntax highlighting.
- Red = Lua keywords. These are reserved and cannot be used for variable and function names, etc. The reserved keywords are:
and,break,do,else,elseif,end,false,for,function,if,in,local,nil,not,or,repeat,return,then,true,untilandwhile. - White = default text like user variables, functions, and operators, etc.
- Blue = literal strings (i.e. text wrapped in quotes).
- Green = comments.
Autocomplete

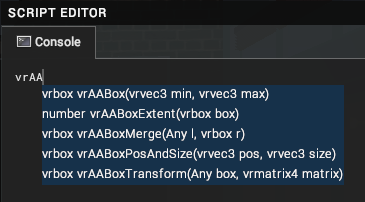
The autocomplete list appears for Visionary Render Lua functions (which are prefixed by “vr”) and registers. It appears automatically as you type. Double-click on one of the options to insert its text into the editor. Alternatively, use the Up and Down arrow keys to navigate the list and press Enter to select an option.
Registers
The Script Editor gives access to some standard registers. These are variables that are specific to the script and node that the script is attached to. They are presented as an autocomplete list when an underscore is typed in the text editor.
| Register | Description |
|---|---|
__Event | The event node that was triggered (available in all events). |
__Gesture | The name of the gesture that was made. |
__Hand | The hand that triggered the event (false = left, true = right). |
__KeyCode | The value of the key that was pressed. Tracker buttons start at 1000, mouse buttons start at 2000. |
__KeyState | Whether the key in __KeyCode was pressed or released (1 = pressed). |
__Other | Event specific node. |
__Pose | The name of the pose that was made. |
__PoseState | The state of the pose (true = entered, false = exited). |
__Script | The script node containing the code being executed (available in all events). |
__Self | The node that the event node is attached to (e.g. an Assembly). Available in all events. |
__Time | The total number of seconds since the application started (available in all events). |
__TimeDelta | The time in seconds since the last call to the event. |
__User | The user who triggered the event (available in all events). |
Drag-and-drop
The text editor can accept nodes dragged from one of the tree views or Browser. In response, it creates a variable in the current Script that links to the dropped node.

The image above shows a variable that has been automatically created in this way. You can change the name of the variable but not its target. Click on the variable name to select the target node in one of the tree views.
When dragging and dropping from the 3D view, a combination of Ctrl and/or Shift can be used to select which node to add to the script:
| Modifier Key | Action |
|---|---|
| None | Add the Assembly that was dragged. |
Shift | Add the GeoGroup of the part that was dragged. |
Ctrl | Add the Model of the part that was dragged. |
Ctrl + Shift | Add the Material of the part that was dragged. |
Context Menu
Right-click in the text area to show the context menu.
| Option | Description |
|---|---|
| Execute | Compile and execute the current script and report any errors to the Output panel. This also saves the script. |
| Undo / Redo | Undo or redo changes to text. |
| Cut / Copy / Paste | Cut, copy, or paste text. |
| Select All | Select all the text in the script. |
| Delete | Delete the selected text. |
| Help | Show the LUA API reference in the Output panel. |
Output Panel
The Output panel displays any compile errors and text printed by Lua scripts. Click and drag the bar above it to adjust its vertical size. Right-click in the text area to open the context menu.
| Option | Description |
|---|---|
| Copy | Copy the selected text to the clipboard. |
| Clear | Clear all the existing output. |
Console

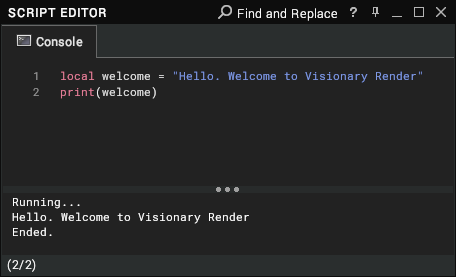
The Console tab can be used to create and execute simple scripts, such as to perform automation tasks. Simply enter a script in the text editor (it can be multiple lines), then right-click in the text area and select Execute from the context menu, or press Ctrl + E.
The Output panel will display any errors if the script failed to compile. If the script is okay, the Output panel will show any output, followed by the text Ended. when execution of the script is complete.
Find and Replace
Click on the button to show or hide the Find and Replace bar. It can also be shown from the Script Editor with
Ctrl + F.
Find
| Option | Description |
|---|---|
| Find | Search for text in the current tab (default option). |
| Find (All Tabs) | Search for text in all open tabs. |
| Find (Entire Scene) | Search for text in all Scripts in the scene. New tabs will be created for any Scripts that contain the text but aren’t already open. |
Enter the text to search for in the text edit box and press the Find Next button to trigger the Find operation. The text in the Find box is coloured red when it can’t be found.
Replace
| Option | Description |
|---|---|
| Replace | Replace the next instance of the text in the Find box with the text in the Replace box (default option). |
| Replace All | Replace all instances of the text in the Find box with the text in the Replace box. |
Enter the text to be inserted in the text edit box and press the Replace Next button to trigger the Replace operation.
The scope of the Replace is determined by the Find combo box.
Filters
| Filter | Description |
|---|---|
| Match case | Perform a case-sensitive search (i.e. a search for lower case ‘a’ would ignore any capital A’s in the text). |
| Match whole word | Ignore any words that contain the search text in them but have other characters. |
| Match whole word | Ignore any words that contain the search text in them but have other characters. |