Network
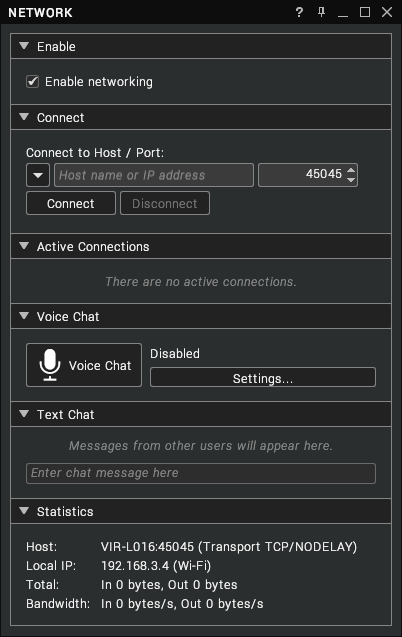
Visionary Render enables multiple users to work collaboratively over a network. You can interact with each other and the 3D scene from machines in the same building or across different countries. The Network window facilitates such a collaboration.

To open the Network window, click on the Virtalis button at the top-left of the Toolbar and select Windows > Network. Alternatively, click and hold left mouse button over the Windows menu of the Toolbar and select Network. It can also be shown or hidden with Ctrl + J.
Overview
- The different instances of Visionary Render need to be visible to each other over the network to permit collaboration. You may require assistance from your company's IT department to configure the network.
- A user is identified by the IP Address or name of the PC they are using.
- All instances of Visionary Render must be of the same version and revision number. Attempting to collaborate between different versions can result in unexpected results (such as the ocean not rendering on all machines). If nodes have incompatible versions they will be highlighted yellow in the Tree View.
- There is no limit on the number of Visionary Render instances that can be involved in a collaboration.
- Once in a collaborative session, any member can load a scene. When a member loads a scene, it is transmitted across the network to the other members. This will take some time. How much time it takes will be dependent on the size of the file loaded and the speed of the connection between the members.
- Any member can leave the session at any time by quitting Visionary Render or disconnecting. All the other users will remain connected.
- Any instance of Visionary Render can connect their view to another member of the collaboration's view. They can disconnect their view at any time.
- Any member can modify the scene - move assemblies, change materials, etc.
- Any changes to the scene by any member are transmitted to all members in the collaboration.
- Any member can save the scene to their local PC at any time.
- One instance of Visionary Render is considered the Master and is responsible for running any scripts and animations. The Master is usually the instance that was started first. If the Master leaves, another instance is automatically selected to become the Master.
Enable
When the Network window is first opened, you may see the following:
Click on the Enable networking checkbox to enable networking.
This enables both outgoing and incoming connections. Other users will be able to connect at any time after networking has been enabled. To disable networking, click on the checkbox again.
Networking can also be enabled from the Network menu in the Start Room.
Connect

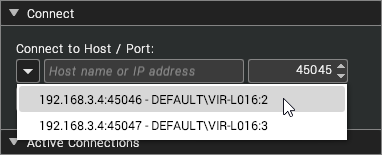
To start a collaboration, one instance of Visionary Render needs to initiate the connection to another member. To connect, select a machine from the drop-down arrow to the left of the text area or enter the name or IP address of a machine in the text area. Now click on the Connect button to start the collaboration.
The number to the right is the port number, which should usually be left at its default value of 45045. Visionary Render listens for incoming connections on this port, or the next available port if 45045 is already in use.
You can use the -net-enable and -net-port <port> command line arguments to start Visionary Render with a different port number.
The drop-down list is automatically populated with recently used addresses, along with any instances of Visionary Render with networking enabled that are discovered on the local network. If an instance cannot be discovered automatically - for example, when connected via a VPN - the address can be obtained by asking the other user to read it from the Statistics panel in their own Network window.
When connecting to a user who is already part of a collaboration session, Visionary Render will automatically establish connections to all the other members. A new user can connect to any of the existing users to join the session.
It is possible to load a scene before connecting to a collaboration session. If other members have also loaded the same scene, this will reduce the amount of data that has to be transferred. If any changes have been made to the scene, the user who initiated the connection will receive the other member's version of the data. If other members have loaded a different scene, Visionary Render will merge the scenes.
Disconnect
To leave a collaboration session, press the Disconnect button. This closes the connections to the other members of the collaboration, but leaves the remaining members connected to each other. The scene remains loaded for both the disconnected user and the remaining members but is no longer synchronised.
It is possible to reconnect to a session after leaving.
Active Connections
This shows a list of the connections to the other members in the current collaboration session.
Voice Chat
The voice chat panel allows you to communicate with other collaborators using your microphone. Click on the Voice Chat button to enable or disable voice chat.
Usage and Troubleshooting
- When voice chat is enabled and you are in a collaboration session with at least one other user, Visionary Render detects sound on your microphone and broadcasts it to the other users. The voice chat panel displays the detected sound level and an indication when sound is being broadcast.
- The other users will hear your voice coming from the direction of your avatar. The volume does not decrease with distance as it would in the real world, enabling you to talk to collaborators over large distances in the virtual world.
- Voice chat does not require any additional network configuration compared to normal collaboration - the voice data is sent over the same connection. However, this means that voice chat may be interrupted when loading a large scene or connecting to other collaborators, especially if the network bandwidth is limited.
- Before starting Visionary Render, ensure that your microphone and headphones (especially those with USB connections) are connected and working properly - Visionary Render detects the audio devices as it starts up and any devices connected afterwards will not be available.
- If you disconnect and reconnect a device while Visionary Render is running, it may work only when the "Use Voice Capture DSP" option is turned off. You may also need to toggle the voice chat feature off and on again.
- If you use voice chat at the same time as any other voice chat application (such as Microsoft Teams or Zoom), your voice will be broadcast on both applications at the same time, which can result in echoes and feedback if another user is also running both applications. Similarly, connecting via remote desktop to another machine running Visionary Render can result in sound being echoed back to you.
- When using the microphone in an Oculus Rift headset, select the device labelled "Rift Audio", not the device labelled "Oculus Virtual Audio Device".
Settings
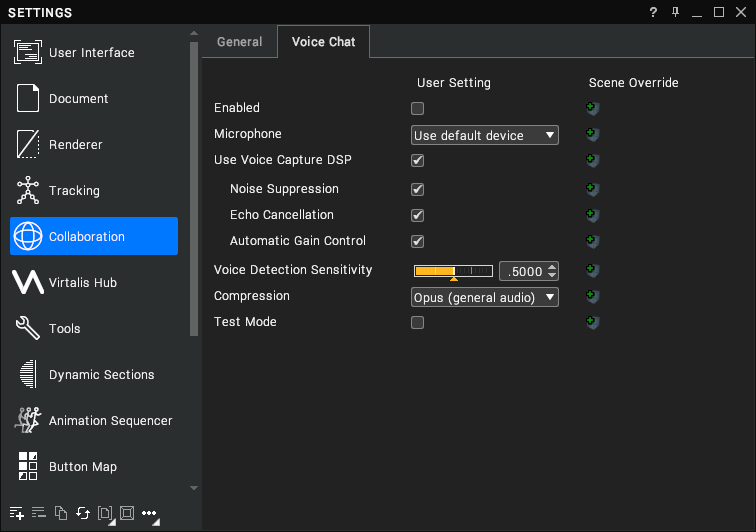
There are various settings that can be configured by clicking on the Settings... button or by navigating to Settings > Collaboration > Voice Chat.

| Setting | Description |
|---|---|
| Enabled | Enables voice chat with other users in a collaboration session. |
| Microphone | Selects the audio capture device. |
| Use Voice Capture DSP | Enables audio enhancements such as noise suppression and echo cancellation. Some microphones provide similar enhancements independently of Visionary Render, e.g. through the “Additional device properties” in the Windows sound settings, in which case the recording quality might be slightly clearer with this option turned off. |
| Noise Suppression | Reduces background noises such as hum and hiss. |
| Echo Cancellation | Stops other users from hearing echoes of themselves when the sound from the speakers is picked up by the microphone. |
| Automatic Gain Control | Automatically adjusts the recording level. |
| Voice Detection Sensitivity | Sets the volume at which a broadcast to other users is triggered. |
| Compression | Selects the type of compression used to reduce the amount of data sent over the network. |
| Test Mode | Plays the sound back on the local speakers/headphones so that the microphone can be tested. Note: this may cause feedback if echo cancellation is turned off. |
Text Chat
The text chat panel allows you to send text messages to other collaborators, which can sometimes be a useful alternative to voice chat (such as when your microphone isn't working). Simply click in the text box labelled "Enter chat message here", type your message, then press Enter to send it to all collaborators. The message will show your computer name, process number (to differentiate between processes when there are multiple instances of Visionary Render running on the same machine), and user name. Your messages will appear in blue and other users' messages will appear in grey.
To copy the text of a message to the clipboard, right-click on the message and choose Copy.
The chat area can display up to 40 message bubbles at a time. If the limit is reached then old messages will be deleted.
Statistics
| Statistic | Description |
|---|---|
| Host | The host name of your machine and the port on which Visionary Render will accept connections. Other users can enter these to start a collaboration session with you. |
| Local IP | The local IP address(es) of your machine (with any associated physical or virtual adapters in parentheses). Other users can use an IP address instead of a host name to connect to you. |
| Total | The amount of data transferred to and from your machine. |
| Bandwidth | The actual speed at which data is being transferred to and from your machine. |